Showing posts with label Identity Server. Show all posts

Monday, January 26, 2015

Email based login for tenants - For WSO2 Carbon based Products.

This simple blog post explains how to configure WSO2 Carbon based servers to support email authentication for tenants.

e.g :  If the tenant domain is pavithra.com and if the email user name of the tenant user is pavithra@wso2.com, then "pavithra@wso2.com@pavithra.com" should be able to login to management console of WSO2 products

1) To support email authentication, enable following property in user-mgt.xml (CARBON_HOME/repository/conf)


2) Change following two properties in primary user store manager


3) Remove following property


After this configuration, tenants will be able to login with email attribute (email@tenantDomain)

e.g : pavithra@wso2.com@pavithra.com

References :

https://wso2.org/jira/browse/IDENTITY-1766

Thursday, January 22, 2015

Configuring Active Directory (Windows 2012 R2) to be used as a user store of WSO2 Carbon based products

The purpose of this blog post is not to explain the steps on how to configure AD as primary user store. Above information is covered from WSO2 Documentation. My intention is to give some guide on how to configure AD LDS instance to work over SSL and how to export/import certificates to the trust store of WSO2 servers.

To achieve this, we need to

  1. Install AD on Windows 2012 R2
  2. Install AD LDS role in Server 2012 R2
  3. Create an AD LDS instance
  4. Install Active Directory Certificate Service in the Domain Controller (Since we need to get AD LDS instance work over SSL)
  5. Export certificate used by Domain Controller.
  6. Import the certificate to client-truststore.jks in WSO2 servers.

Also this information is already covered from following two great blog posts by Suresh. So my post will be an updated version of them and will fill some gaps and link some missing bits and pieces.


1. Assume you have only installed Windows 2012 R2 and now you need to install AD too. Following article clearly explains all the steps required.


Note : As mentioned in the article itself, it is written assuming that there's no existing Active Directory Forrest. If you need to configure the server to act as the Domain Controller for an existing Forrest, then following article will be useful


2) Now you've installed Active Directory Domain Service and the next step is to install AD LDS role. 

- Start - > Open Server Manager -> Dashboard and Add roles and feature

- In the popup wizard, Installation type -> select Role-based or feature based option and click the Next button. 

- In the Server Selection, select current server which is selected by default. Then click Next.


- Select AD LDS (Active Directory Lightweight Directory Service ) check box in Server Roles  and click Next.


- Next you'll be taken through wizard and it will include AD LDS related information. Review that information and click Next.

- Now you'll be prompted to select optional feature. Review it and select the optional features you need (if any) and click next.

- Review installation details and click Install.

- After successful AD LDS installation you'll get a confirmation message.

3. Now let's create an AD LDS instance. 

- Start -> Open Administrative Tools.  Click Active Directory Lightweight Directory Service Setup Wizard.


-  You'll be directed to Welcome to the Active Directory Lightweight Directory Services Setup Wizard. Click Next.

- Then you'll be taken to Setup Options page. From this step onwards, configuration is same as mentioned in 


4. As explained in above blog, if you pick Administrative account for the service account selection, then you won't have to specifically create certificates and assign them to AD LDS instance. Instead the default certificates used by the Domain Controller can be accessed by AD LDS instance.

To achieve this, let's install certificate authority on Windows 2012 server (if it's not already installed). Again I'm not going to explain it in details because following article covers all required information


5. Now let's export the certificate used by Domain controller

- Go to MMC (Start -> Administrative tools -> run -> MMC)
- File -> Add or Remove Snap-ins
- Select certificates snap-in and click add.


-Select computer account radio button and click Next.
- Select Local computer and click Finish.

Now restart the Windows server.

- In MMC, click on Certificates (Local Computer) -> Personal -> Certificates.
- There you'll find bunch of certificates.
- Locate root CA certificate, right click on it -> All Tasks and select Export.

Note : The intended purpose of this certificate is all. (Not purely for server authentication.) It's possible to create a certificate for server authentication and use it for LDAPS authentication. [1] and [2] explains how it can be achieved.

For the moment I'm using the default certificate for LDAPS authentication.


- In the Export wizard, select Do not export private key option and click Next.
- Select DER encoded binary X.509 (.cer) format and provide a location to store the certificate.

6. Import the certificate to trust store in WSO2 Server.

Use following command to import the certificate to client-truststore.jks found inside CARBON_HOME/repository/resource/security.

keytool -import -alias adcacert -file/cert_home/cert_name.cer -keystore CARBON_HOME/repository/resource/security/client-trustsotre.jks -storepass wso2carbon

After this, configuring user-mgt.xml and tenant-mgt.xml is same as explained in WSO2 Documentation.


Thursday, March 29, 2012

Configuring OpenID based SSO when host name is changed in WSO2 Carbon based products

The default host name of WSO2 Carbon based products is "localhost" which can be configured through "HostName" property in CARBON_HOME/repository/conf/carbon.xml. If this value is "localhost" the management console url looks like https://lcoalhost:9443/carbon/ (You can observe this value at server startup).

But most of the time, it's preferred to use some other suggestive value for host name rather than using default value.
e.g. wso2.com so that managment console url will look like https://wso2.com:9443/carbon/

In this blog post I'm going to use WSO2 Identity server as the Carbon based product since by default WSO2 IS supports SSO via OpenID. But same steps are applicable to all other WSO2 products.
In order to change the host name and management console url, you have to change the host name value in CARBON_HOME/repository/conf/carbon.xml to wso2.com as I've done below.


Change identity.xml as follows.


If you are a Ubuntu user, then you have to add following entry in /etc/hosts file
127.0.0.1 wso2.com

If you are a windows user, then above file is located at c:\windows\system32\drivers\etc\hosts

Now if you start the server, you'll see that it starts without any errors. After the server successfully starts, sign in as admin user and go to My Identitys -> InfoCard/OpenID and copy the OpenID url provided by WSO2 Identity Server which will look like "https://wso2.com:9443/openid/admin"

If you use this url to sign in to an external SSO client or internal client provided by WSO2 IS, you'll encounter following error.

[2012-03-30 10:37:52,427] ERROR {org.wso2.carbon.identity.relyingparty.ui.openid.OpenIDConsumer} - 0x704: I/O transport error: hostname in certificate didn't match: !=
org.openid4java.discovery.yadis.YadisException: 0x704: I/O transport error: hostname in certificate didn't match: !=

To overcome this, relevant certificate should be imported to keystore used by WSO2 IS or you can specify a new keystore which has a matching public certificate.

The steps needed to create a keystore with matching certificate and configure IS to use that keystore can be found in this blog post written by Hasini.

In creating the new keystore, you should keep in mind to provide the host name of your new carbon server as the Common Name (CN).

e.g. :

keytool -genkey -alias iscert -keyalg RSA -keysize 1024 -keypass password -keystore iskeystore.jks -storepass password
What is your first and last name?
[Unknown]: wso2.com
What is the name of your organizational unit?
[Unknown]: qa
What is the name of your organization?
[Unknown]: wso2
What is the name of your City or Locality?
[Unknown]: Colombo
What is the name of your State or Province?
[Unknown]: Western
What is the two-letter country code for this unit?
[Unknown]: SL
Is CN=wso2.com, OU=qa, O=wso2, L=Colombo, ST=Western, C=SL correct?
[no]: yes

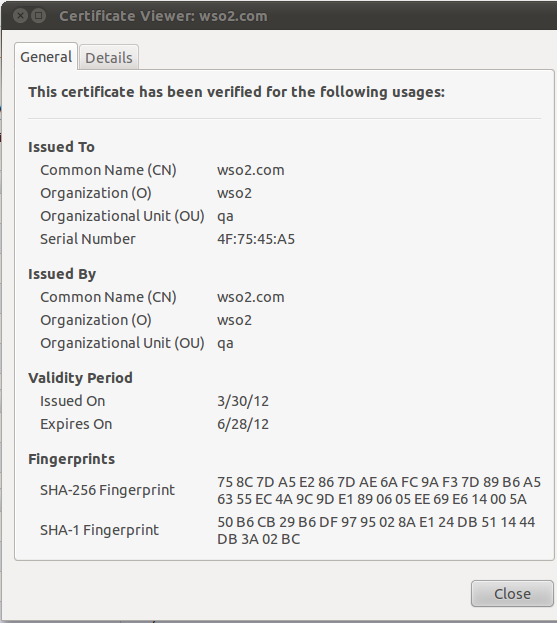
After you successful configure IS to use new key store start the server and access management console. You can verify your configuration by viewing the browser certificate.


Now if you try to login with openid url, the login will be successful.


Thursday, March 8, 2012

How to configure WSO2 Identity Server to act as a Key Distribution Center?

From WSO2 Carbon version 3.2.0 onward, all the products are embedded with LDAP server.  This embedded LDAP has a KDC (Key Distribution Center) running which is capable of issuing Kerberos tickets to clients and services who are in the LDAP server. By default this KDC is disabled. Let's see what are the steps that we should follow to enable this KDC.

In this blog post I'm going to explain how to enable KDC in WSO2 IS 3.2.3

You have to change following configuration files in order to enable KDC

1) embedded-ldap.xml (CARBON_HOME/repository/conf)


2) user-mgt.xml (CARBON_HOME/repository/conf)


If KDC is sucessfully enabled, you'll see followng log printed when server is starting

INFO {org.apache.directory.server.kerberos.kdc.KdcServer} - Kerberos service started. Kerberos service started.


In addition to acting as a KDC,  WSO2 IS supports adding Service Principals through UI. To achieve this  login through management console and go to Configure -> Kerberos KDC -> Service Principals. You can see that "Add new service principals" option is now enabled and you'll be able to add service principals through that option as shown in following image.


Tuesday, February 21, 2012

Rule combining algorithms explained using WSO2 Identity Server 3.2.3


In this blog post I'm going to explain how overall response of a XACML policy changes with different rule combining algorithms. We are going to use WSO2 Identity Server 3.2.3  as XACML engine.

Let's consider following policy.

1. The first rule's effect is deny. According to this rule, anyone who belongs to "dev" group is NOT allowed to read the personal information record of Jerry.

2. The second rule says that a person who is at least 5 years scenior to Jerry can read Jerry's personal information record.


So what will be the final outcome of policy evaluation if Tom (who belongs to "dev" group) is 7 years senior to Jerry ? Should we totally ban Tom from reading those records or should we allow him to read them considering about his experience and seniority ?

This is a decision which can be handled/changed through policy based on the actual requirement.

1st scenario :

Regardless of their experience, we want to prohibit people belonging to "dev" group from reading Jerry's personal information. In this situation we need to use above policy with "deny-overrides" as rule combining algorithm.

For following request, XACML engine will return "Deny" as the result.


2nd scenario :


We need to allow read permission to anyone who is at least 5 years senior to Jerry.

In this case role should be neglected if above requirement is fulfilled.

We can use the same policy after changing the rule combining algorithm to permit-overrides.

To change the rule combining algorithm, click "Edit"  in Home -> Entitlement -> Administration. Then change the rule in " Edit Policy Element" page and save the policy.


Note : You have to enable the policy every time you edit it.

Now send the same request (given in 1st scenario) again. "Permit" will be returned as the result.

3rd scenario :

 Now let's see about the next rule combining algorithm. i.e. first-applicable. Here the first applicable rule will be picked up from the set of rules defined in the policy.

To change the rule combining algorithm, go to "Edit Policy Element" page by following the instruction I've given above and change the algorithm to first-applicable.

In our sample policy, there are two rules. First rule evaluates to deny and second one evaluates to permit decision.


Keep the policy as it is (only change the rule combining algorithm) and send the request given in scenario 2.  You'll receive "Deny" as the result because the first applicable rule (for the request) evaluates to deny.

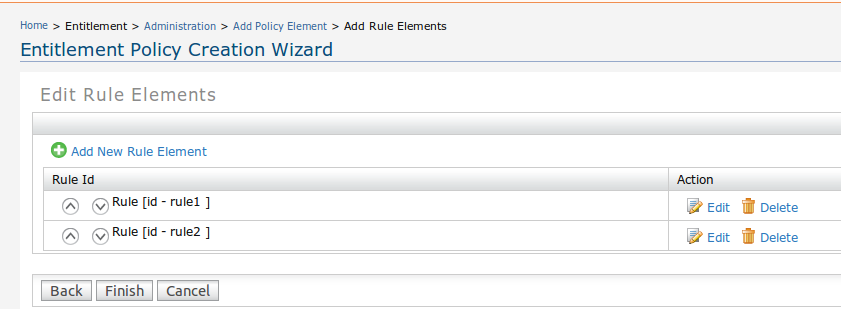
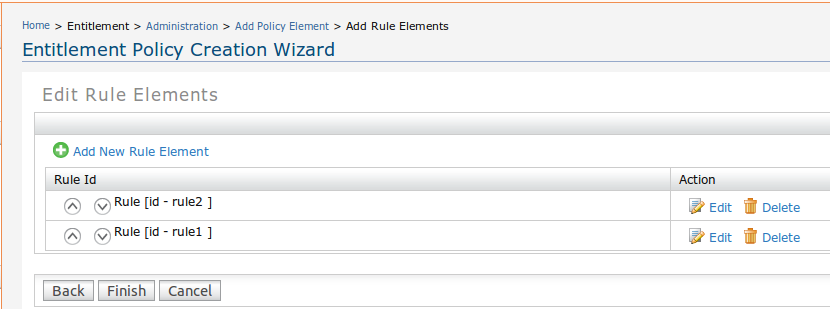
Now go to "Edit Rule Elements" page (Entitlement -> Administration -> Edit -> Next -> Next) and change the order of rules as shown below.


If you send the same request again, the result will be "Permit".

You can see that by changing the order of the rules in policy, you'll be able to change the final decision.

In this blog post, I tried to explain the behavior of different rule combining algorithms using one policy. In the next post, let's see how policy combining algorithms can affect the policy decisions.